Norma Bassett Hall

Chipping the Block, Painting the Silk: The Color Prints of Norma Bassett Hall. On display at the Whatcom Museum through February 14, 2015.

Norma Bassett Hall was a Northwest print maker who worked in moku-hanga and was a pioneer in serigraph. The exhibit includes sixty of Norma’s prints, along with a sample carved wooden block, a hand made book, and proof series showing the cumulative effect of each block.

Highly recommended. Afterwards treat yourself to a meal at the Mount Bakery Cafe or the Old Town Cafe.

The Language of Prints

I saw an excellent print show entitled, “The Language of Prints” at the Johnson Museum of Art at Cornell University. Runs through July 27, 2014. Here are some of my favorites.


Redo with Aquatint

This evening, I made a second plate using an aquatint screen. The second plate has more subtle texture and variation in the line widths and does not produce lines with open bite.

Here’s the second plate. This plate was exposed first with an aquatint screen and then a second time with the artwork. In this plate, the lines are made up of microscopic pits, instead of open grooves.

The plate with aquatint shows more subtle variation in the line widths.

For comparision, here is the original artwork, the print from the aquatint plate, and the print from the first plate.

This is the artwork that I used for the plate exposure. My goal is for the prints to match the original artwork as closely as possible.

The second plate makes use of aquatint. Here there is a greater variation in line width and all lines print without open bite.

This print is from the first plate. That plate didn’t use aquatint and may have been over-etched, resulting in open bite and thicker lines.

Starting a New Print

I just made an intaglio print based on one of my favorite line drawings. The original charcoal drawing is from my time in Geoff Flack’s Foundation Figure Drawing course back in 2010. I made the plate last night from a piece of SolarPlate. The results were decent for a first attempt, but I think in the end I failed to capture the subtlety of the line drawing. My next attempt will be an aquatint, which hopefully will more accurately reproduce the softness in the charcoal lines.

This photopolymer plate works like a classical etching in copper, where the grooves hold the ink and the smooth surface is wiped clean. I’m concerned that I will get open bite in the shoulder area because the lines are too wide. Open bite happens when the groove is so wide that the capillary forces in the ink are unable to hold the ink in place as the plate is wiped. I’m still investigating why the lines in the shoulder are so thick. It could be the original artwork, or I may have over developed the plate.

The first step in printing intaglio is to apply ink to the plate. I like to use a scrap of cardstock to help push the ink into all of the grooves.

Here I’m starting to wipe the plate with a piece of tarlatan (basically a piece of cheesecloth that has been heavily starched). The goal for this pass is to remove the heaviest ink deposits while grinding the ink into the lines.

After removing the bulk of the ink with the tarlatan, I switch to newsprint which removes surface ink while leaving the lines. The newsprint also tends to polish the smoother parts of the plate.

At this point, I’ve wiped with tarlatan, then newsprint. All that remains is to clean up any ink that has stuck to the edges of the plate.

Here’s a close up of the plate immediately before printing. I’m a bit concerned that the fingernails are holding too much ink.

Here’s the first print, on a scrap of damp Rising Stonehenge. As I suspected, there is some open bite in the lines of the shoulder, and the lines in the fingers are not as subtle as the original artwork. The grey rectangle is called plate tone and is created by the residual ink on the plate. Plate tone is one of the hallmarks of the intaglio process. In this test print, I over-wiped the bottom of the plate, leading to uneven plate tone.

Holiday Cards

This evening I worked on holiday cards for friends, family, and galleries. I wanted to create something distinctive that would show off a complete series of prints. I experimented with a number of ideas including stacks of trading cards (with bubble gum) and a large square collage in a custom square envelope, but in the end I borrowed an idea from New Yorker cartoonist Mark Ulriksen.

Over the summer I heard him speak about climbing the ladder as a young illustrator and he mentioned that he used an accordion fold design for an early portfolio mailing and found that it worked well because people would leave it standing up on their desks.

The idea sounds simple enough, but it took a long time to prepare reproductions of each of the prints and then lay everything out in Adobe Illustrator. I also made a bunch of test prints on various papers from a Red River Paper sampler pack before ordering the large sheets and envelopes for the actual cards.

A single 17″ x 25″ sheet has room for two accordion fold cards. Here I’m using 68lb Ultrapro Satin Version 3.0 from Red River Paper.

The 17″ x 25″ sheets barely fit in my trimmer. It took quite a while to work out the locations of the various alignment marks. Since I can’t see exactly where the blade will land, I use alignment marks like the triangle on the bottom of the page. In this example, I need to align the triangle with the 5″ mark on the ruler in order to get a perfect cut.

Using a $10 Martha Stewart bone folder from Michael’s to score the folds. It turns out that not all papers are suitable for folding. Red River has a very nice 86lb double sided glossy paper, but I couldn’t use it because it had a tendency to disintegrate when I scored it.

The accordion fold cards are visually appealing and stand on their own.

Scumbling

Imagine a sunset at the end of a crystal clear day. The sky directly overhead is a deep blue that gradually fades to yellow along the horizon. If the air is clear enough, there will be no reds or oranges – just blues and yellows.

How would you go about painting such a lovely view? This is a question I have pondered since I began painting. Some of my recent color gradient printing experiments led to an interesting insight.

The challenge in painting a blue-to-yellow gradient is, as every school child knows, that yellow and blue paints combine to make green. If you start with blue at the top of the canvas and work your way down while increasing the yellow and decreasing the blue, you will get a lot of green in the sky. During a yellow-blue sunset, you may see some green in the sky, but not nearly as much as you will get by mixing yellow and blue paint on the canvas.

The reason the green appears is that paint mixing works on the principle of the subtractive color model. In the subtractive color model, each pigment or dye in the mixture absorbs and subtracts out part of the spectrum. Combine more colors, and more of the spectrum is removed, leading to darker colors. Combine enough colors and you will get a dark gray.

For a long time, I thought the only way to get a yellow-blue gradient with no greens was to gradually add orange to the blue until it desaturated to gray and then remove violet (or add yellow) until the gray transitioned to yellow. This will make a smooth gradient with no green, but it’s not guaranteed to capture the luminous essence of a sunset.

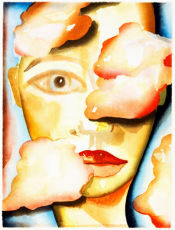
My insight came when I tried printing a blue-to-white gradient on top of a white-to-yellow gradient. I was using an opaque blue ink on top of dry yellow ink, so there was no opportunity for subtractive mixing. Here’s what I got:

As you can see, there is no green! The colors blend directly from blue to yellow. What’s going on? The colors in the print are optically blending. White light that falls on the pigment is reflected back as either blue or yellow. When these two colors fall onto adjacent cone cells in the retina, they create a sensation that simultaneously conveys blue and yellow. The perceived color is a bright neutral, that is warmer or cooler depending on the relative strengths of the yellow and blue pigments.

The colors in a sunset work the same way. Blue light from the sky blends on the retina with yellow light from the sun to form a bright neutral. Both the print and the sunset are examples of the additive color model.

In the additive color model, blue and yellow are complementaries that combine to form a neutral that is brighter than either color on its own. Optical blending, which is based on the principle of additive color, allows us to go directly from blue to yellow without creating green.

Here’s an example of optical blending in a blue-to-yellow gradient.

We see optical blending every day on computer screens and printed items where the images are made up of millions of small pixels or dots. It turns out that we can get this effect in paint as well, using a technique called scumbling.

The basic idea behind scumbling is the same as my printing experiment. A broken pattern of opaque paint is applied on top of a layer of dry paint. The dot pattern in the top layer is created with a dry, lightly loaded brush, that just barely scrapes across the surface, leaving an irregular pattern with lots of gaps where the underlying paint shows through. If you were to scumble opaque yellow paint over dry blue paint, it would look something like the image below.

We’ve seen that subtractive color model governs the blending of wet paint, while the additive color model governs optical mixing techniques like scumbling. When painting a scene that uses optical mixing in the real world, it helps to consider optical mixing as a painting technique.

Further reading:

Epson 3880 Roller Problems

“Theory and practice are the same, in theory, but different in practice.”

My first attempt at eliminating track marks on my ImagOn emulsion was to make a window mat carrier, the theory being that the rollers on the border of the window would lift the center rollers above the surface of the ImagOn.

My plan was to make a window mat carrier that would lift the top rollers above the surface of the ImagOn in order to avoid track marks.

I tried a bunch of different window mat carriers and found they either had no impact on the track marks or they got hung up on the top edge of the window mat. A quick look inside the printer and a perusal of the service manual showed me the problem (see page 53 and section 5.3.17).

The top side of the Epson 3800 paper feeder has 8 roller assemblies, each 2″ wide and holding two small rubber rollers. The rollers are organized into an assembly called the grid roller. The paper passes from back to front under the grid roller on the way to the print head. The grid roller presses the paper against a steel paper feed roller that actually pulls the paper forward.

Each roller assembly is free to move up and down independent of its neighbors. A metal spring clip holds the roller assembly firmly against the paper.

Because the roller assemblies can move independently, the ones inside the window will roll across the surface of the plate. This roller is partially inside the window mat with the top edge riding on the edge of the mat.

In practice, the rollers fall into the window in the mat and run across the surface of the emulsion, leaving track marks.

Once I had a good understanding, I tried a couple of ideas without success:

  • Ran a printer cleaning sheet in case dust or goop on the rollers was responsible for the marks.
  • Attempted to reduce the pressure on the rollers by increasing the paper thickness setting. My hope was that this setting would prevent the Paper Guide Upper Assembly (see page 53 in the service manual) from pressing down quite as hard.
  • Attempted to reduce the pressure on the rollers by setting the paper type to glossy. My hope was that the printer might use less pressure when printing on glossy.
  • Tried printing on a very thin plate consisting of ImagOn laminated to a piece of Pictorico OHP transparency film. This plate was thin enough to run through the sheet feeder. My hope was that the Paper Upper Guide Assembly might not be able to exert as much pressure on really thin media.

I’ve considered, but not tried the following ideas

  • Somehow pull the middle 6 roller assemblies up against their spring clips so that they can’t touch the emulsion. This would leave the 2 roller assemblies on the end to move the plate. I don’t plan to try this because it might void my warranty and because the rollers are probably necessary to keep the media flat as it goes under the print head.
  • Make the ImagOn surface more resistant to scuffing by removing the protective plastic and letting the plate dry, exposed to air before printing.
  • Make the ImagOn surface more resistant to scratching by heating the plate. Not sure if heating the plate will harden or soften the emulsion.
  • Make the ImagOn surface more resistant to scratching by cooling or even freezing the plate. This approach may have problems with condensation.
  • Make the ImagOn surface more resistant to scratching by pre-treating it with vinegar. I don’t know whether the plate is still light sensitive after being treated with vinegar.

As you can see, I’m pretty close to being out of ideas. It is possible that ImagOn DTP only works with high end printers like the 4900, 7890, 7900, 9890, 9800, and 9900 that use vacuum suction to hold the paper in place without touching the top surface.

It is also possible that my 3880 is defective and pressing down too hard. I will know tomorrow whether my printer is defective. If it is not, I may have to give up on DTP and make a strategic retreat to single exposure ImagOn. This means I will need a vacuum frame, but I won’t need a calibrated light source.


Epson Printer Woes

The problem with the Epson 3880 tractor marks was on my mind all night. I was wondering whether the problem was limited to the manual front feeder, so this morning I ran pieces of Epson brand card stock through the sheet feeder, the rear manual feeder, and the front feeder. What I found is that each piece of card stock showed track marks running from top to bottom in the same locations as I saw track marks on the ImagOn plates.

Since I had observed the problem with Epson media, and the media wasn’t even exotic I decided to call Epson customer support. The Epson customer service agent said that it sounded like a problem with the printer. He said when people call in about marks, the marks are almost perpendicular to the direction the paper travel and can be caused by a wide variety of software and configuration problems. He almost never hears about tractor marks running in the direction the paper travels and says this is almost always a sign of a hardware problem. The fact that I was seeing the marks after loading and then unloading a sheet via the front manual feeder without even printing confirmed his suspicions that my printer is defective. He said the top drive wheels should never leave a mark on the paper and certainly should not be able to mar the surface of a sturdy material like card stock.

I have my doubts, but I’m crossing my fingers that he’s right. They are shipping me a replacement unit which should arrive on Tuesday.

Overall, my experience with Epson customer service was good, but I was a little taken aback that the replacement unit is a refurbished printer. It seems like my almost new, but defective printer should be replaced with a new unit.