Spheres keep rolling along

I am making slow, but steady progress on my white sphere. One of these days I will actually finish it. Here’s the update.

I use the very tip of a super sharp piece of charcoal to reach down inside each pit in the paper, without hitting the ridges.

Here’s the newest sphere. I’ve probably spent about 20 hours on this drawing, mostly learning to lay down smooth layers of charcoal. I am learning, though, because this sphere is much smoother than my first attempt.

Here’s my first attempt for comparison. Notice the vertical lines in this early sphere which aren’t visible in the third sphere.

Lauren

Lauren posed for four weeks in January. Normally this would translate to 20 three-hour sessions for a full time student. I got about eight sessions with this pose. I started with a very loose block in the first session, then started a second block in for the next session, and then transferred that block in to a clean piece of paper for the third session. This approach has its pros:

  • One can draw very freely and more easily maintain the gesture while learning the pose.
  • One can take risks and make changes without worrying about damaging the paper in a way that will hurt the final drawing.
  • Doing multiple block ins from scratch really helps in seeing and learning the pose.

and its cons:

  • The extra block ins take up time that could be used for rendering.
  • When you transfer the block in to another sheet of paper, you almost always lose subtle visual cues that give the drawing life and cohesion.

I wasn’t very happy with the drawing at the end of the last session, but it has grown on me and it looks great in the photo.

Still Rendering . . .

I’m on my third attempt at rendering a sphere and my rendering has really improved. Most of the time I am able to get a smooth tone on top of the textured lines in the Strathmore paper. My paper is no longer turning to felt from abrasion, and I no longer create visible strokes in the drawing. Here are a few things I’ve learned:

  • Work very slowly, adding charcoal a molecule at a time.
  • Make multiple passes, moving the charcoal in many different directions.
  • Don’t move the charcoal quickly because the hard impact with ridges will leave marks.
  • Keep the stick of charcoal close to perpendicular to the paper so that only the point touches – don’t lay the charcoal on its side.
  • It is essential that you sharpen the charcoal as you go – sometimes every few minutes. You can sometimes sharpen the stick on the paper as you draw by rotating it, but when you hit a soft part of the stick and the point dulls you will need to resort to sandpaper to restore the fine point.
  • Lift off dark flecks of charcoal with a tortillon folded from newsprint or paper towels.
  • Also use the tortillon to smooth out any ridges that appear.
  • Don’t use the tortillon to smudge the charcoal in attempt to get a smooth tone. This will break down the paper and the smudge doesn’t look as good as a hand-rendered tone. The tortillon should only be used to move grains of charcoal from one place to another.
  • Often flaws are more apparent from a distance. I am near sighted and find that if I remove my glasses I can easily spot light and dark patches that I can’t see with focused vision.

My renderings are still a bit sparkly. If you look at them closeup, you will see lots of black dots of charcoal and white patches without charcoal. Some of my classmates in the atelier are able to make their drawings look like airbrush paintings. I still have a ways to go, both in quality, and in rendering speed.

This is a closeup of the sphere, the table it sits on, the core and cast shadows, and the background. My rendering has improved to the point where the charcoal is fairly smooth, even on textured paper.

In this picture you can see the ridges in the paper. My technique has now improved to the point where the charcoal stays smooth across the rigdes and valleys. The lines you are seeing are the shadows cast by the ridges.

Here’s one more view of the ridges in the paper.


Meanwhile back at the atelier . . .

You might think that with all of the printmaking and woodworking going on that nothing was happening in the atelier. Au contraire, mon frère – we are all busy learning to render. Rendering in charcoal is a very slow process and learning to render is even slower, so I don’t have a lot to show even though I have been working hard.

Our goal was to learn to render a white sphere lit by a single light source. The easy part was learning what the sphere is supposed to look like – there is actually a lot of nuance in the play of the light and shadow, but you can see it once you know what you are looking for. The really hard part – and the part that takes all of the time is learning to make smooth gradations of gray with charcoal.

You would think this would be easy, but the surface of the paper is actually covered with tiny ridges and valleys, and the ridges tend to pick up charcoal and get darker, while the valleys stay white. This leads to a sparkly look. To get the tone completely smooth requires many many very light passes of charcoal. You need to hit the same spot of paper over and over again in order to break down the paper’s sizing and open up the surface to accept the charcoal. Press too hard, though, and the surface will get too dark before you are able to lay down enough layers to get a smooth tone. And heaven help you if you sneeze.

Musicians practice scales before concertos. As artists, our first rendering exercise is value scales. This scale, which is made of 1″ squares, took me about six hours and it is still a bit sparkly. Must learn patience, grasshopper.

Before rendering spheres, we practice value scales.

After doing value scales on two different types of paper (Strathmore 500 Charcoal and Canson Mi Teintes), I was ready to move on to value studies. Since a fully rendered sphere takes about 30 hours, we really wanted to look before leaping, so each of us made a number of postage stamp value studies. I was able to do these six in about 4 hours.

A carefully rendered sphere can take 30 hours so we do a bunch of value studies first to make sure we will like the outcome.

Finally the big day came and I was ready to embark on the sphere itself. The first step was to get a really good flat white sphere – I used a Christmas ornament, but others have had good success with light bulbs. The sphere is placed in a box that shields it from most stray light so that the shadows stay really clean. It is lit from a single light source which is clamped in place behind my easel. This setup took a lot of careful effort and adjustment, but it was important since the rendering will take 30 hours. In the image below, I’m about 6 hours into rendering and have what Juliette calls a good under painting or ghost image to work from. Now my challenge is to get the charcoal really smooth.

Sphere rendering setup. The blue ear wash bulb is to blow charcoal off the paper. Many a student has learned the hard way never to blow on a charcoal drawing. A single, microscopic drop of spittle can lead to tears.

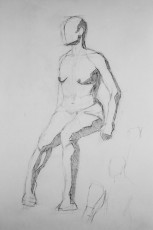
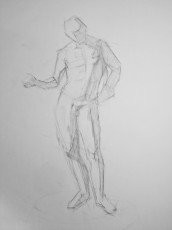
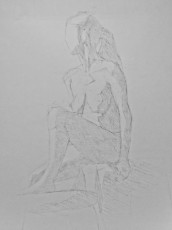
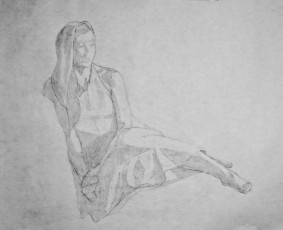
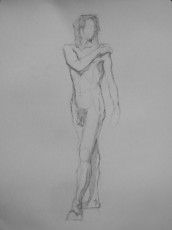
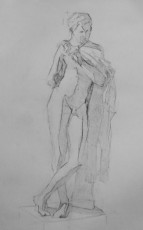
Of course, the ultimate goal is not to draw spheres – it is to learn to render and turn form so that we can draw the figure, still life arrangements, and landscapes. We continue to draw from a model each morning in the life room and the poses are getting longer and longer. We begin each session with 20 minutes of gestures from a variety of poses, but the remaining two and a half hours are dedicated to a single pose the lasts about a month.  This drawing was from right before the holidays. It was about a three week pose and I probably drew 9 days because I am part time. One challenge for me is that I never get a month long pose because I come in every other day. At some point, later in the year, I may have to switch my schedule so that I draw every morning and then work at Microsoft in the afternoons and evenings. This would give me an entire month on one pose, but I would lose out on the coaching I get in the afternoon studio sessions. Life is full of tradeoffs.

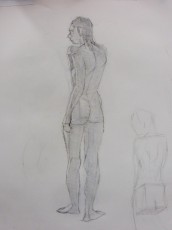
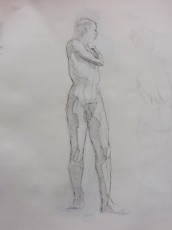
We continue to draw longer and longer poses in the mornings in the life room.

Bottles enter the third dimension

Our most recent Barnstone assignment involved redrawing the three bottles under orthographic projection with geometric constructions for all of the circular cross sections. Here are some learnings:

  1. Wash your hands. When you work for hours on a single drawing you don’t want to see fingerprints.
  2. Sharpen your pencils often and be sure to wipe off the graphite sharpening dust before drawing.
  3. When using a rular or triangle, first place the pencil in the correct position on the paper, then slide the rular up snug against the pencil. This ensures that the line doesn’t end up a half a millimeter away from its intended position.
  4. Draw very lightly.
  5. It is impossible to get all of the angles an intersections perfect. The important thing is to produce an asthetic drawing and this means balancing between perfection where it counts and errors that don’t matter. In the planar cross sections, each circle construction has four lines that intersect at the center of the circle. I feel it is important to nail this intersection point, so I always place the tip of my pencil directly on the intersection before placing my rular.
  6. Start at the top of the bottle and work down, one plane at a time. Don’t attempt to work assembly line style or draw planes out of order. It is too easy to get confused.
  7. Rotate the paper, if necessary, so that you always draw on the side of the rular closest to your dominant hand.

Nailing the Block-in

Here are some drawings from last week. I’ve been struggling for a while with my block ins, but I think some things began to fall into place this week. Here are some areas I am focusing on now:

  • Using mostly straight lines.
  • Carrying lines through the entire image to look for interesting alignments.
  • Identifying interesting angles and rhythms and emphasizing them in my choice of straight lines.
  • Drawing cues to three-dimensional structure inside of the figure, instead of just working around the contour.

This last point is really important. It seems that what I am thinking about as I am drawing has a direct impact on the drawing. If I think of a flat, two-dimensional contour, I will get a flat drawing. If I think of a three dimensional shape, the drawing will convey the third dimension. This all seems obvious in retrospect, but the amazing thing is that it works at the level of my subconscious. I am not analyzing the angles of the third dimension – I am just thinking about the subject as three dimensional and some hidden portion of my mind does the rest.

Analytical Bottle Drawing

We invited our good friends, Chris and Marty, over to help drink the bottle of prosecco that I wanted to use for my Barnestone assignment. The bottle was tall and had these gorgeous curves that complemented my medium height Quinta dos Rouges and my short, but equally curvaceous Perrier bottle. The assignment involved six gestural drawings of each bottle, followed by a detailed, measured drawing of an ensemble of the three bottles on a single page. All told, I spent about 17 hours on the measured drawing, not including the time to drink the prosecco.

Juliette says the point of the assignment is to learn how to see relationships that tie the drawing together, to understand how to break down the structure of the object, to develop line quality, and to work the entire picture at once instead of marching around the contour.