First Monoprint

Here’s another way to add color to a pumpkin – combine monoprinting with relief printing. For this print, I prepared a .030″ PETG plastic plate with the same dimensions as my relief plate. I then painted orange and green Akua Intaglio ink onto the PETG plate and then ran both plates through the press. The color plate went first to lay down rough areas of color. The edges of the colored regions did not need to be well defined because the black relief plate which followed laid down sharply delineated areas of black on top of the colored ink.


Chine-collé

I couldn’t resist trying some other printmaking techniques with my freshly minted plate. This print uses chine-collé to add color to a black and white print. To make this print, I first cut a pumpkin body and stem out of orange and green Thai Unryu paper. I moistened the colored papers and sprinkled them with wheat paste powder and then placed them on a freshly inked plate. When I ran the plate through the press, the colored paper was laminated in place and then overprinted with black all in one step. The process worked great, but I didn’t like the results with this particular plate because it was designed for black and white with lots of lost edges. The colors made the lost edges found and the print lost some of its appeal. Still, I will file this technique away for another print.

Platemaking with Vinyl Stencils

Many people using Solarplate create negatives on transparencies using an inkjet or laser printer. This approach works well for intaglio plates which don’t require a high contrast negative, but it has some drawbacks – the artwork must be created or scanned and fixed up on the computer before printing and you need a high quality printer and lots of expensive ink cartridges.

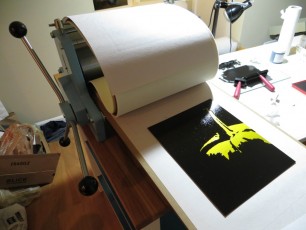
My notans have large areas of solid black, so they more naturally lend themselves to relief printing where the raised portions are inked with a roller and the valleys remain clear. SolarPlate works well for relief printing, but the platemaking process is different because it is essential that all of the photopolymer wash away from the white regions without losing any photopolymer in the black regions. This is important because the photopolymer layer is really thin – typically less than 1mm. Any loss in the relief between the ink bearing plateaus and the white valleys will make it hard to apply the ink to the plateaus without getting it in the valleys.

The key to creating a great relief plate is contrast. To make a plate where the blacks are fully exposed and hardened while the white regions soft enough to dissolve all the way down to bare metal requires a high contrast negative.

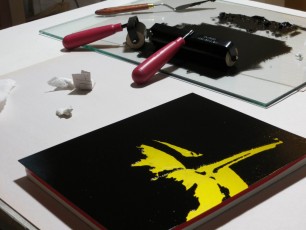
I found that my low end Canon IP90v printer was unable to create negatives with sufficient contrast because its black ink is not opaque. If I hold the transparency up to a light, the blacks appear as weak grays. The result is a plate with pitting in the blacks.

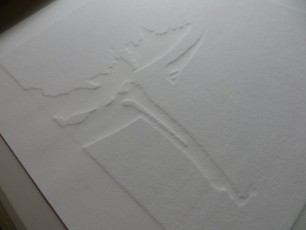
This plate was made with a low contrast negative. When rinsing the white areas down to bare metal I got a lot of pitting in the blacks which weren’t fully exposed.

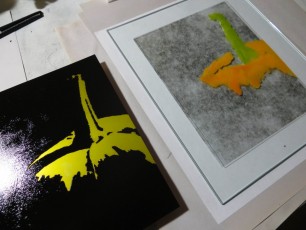
I switched to painting the negatives by hand using either gouache or India ink on vellum. This approach produced negatives with reasonable contrast, but the plate actually picked up the texture of the unpainted vellum. The texture wasn’t really a problem since it was subtle and only appeared in the raised portions of the plate where it actually helped to hold the ink.

The vellum used for this plate was translucent had a fairly coarse grain that showed up on the plate. Notice how the pattern in the grain reveals the wrinkles in the vellum.

The bigger problem was that on the larger plates, the gouache tended to cause the vellum to wrinkle and warp and this led to a poor reproduction because the vellum wouldn’t stay in contact with the plate during exposure.

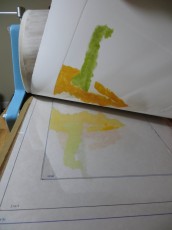
This vellum negative wrinkled because of the large expanse of black gouache. Vellum doesn’t seem to wrinkle if the black regions are small. I was able to successfully make a similar negative for a 5×7″ plate, but when I scaled it up to 8×10″, the wrinkles got out of control.

This plate was made from a vellum negative that was warped and wrinkled due to the water in gouache. Notice the ghost images in some areas that were out of focus and didn’t dissolve down to the metal.

I attempted to solve this problem by painting my negatives on materials like mylar and glass which don’t warp, but I wasn’t able to acheive sufficient contrast, even with gouache. It seems that the fibers of the vellum will wick up paint and ink, making a good solid black. The mylar and glass aren’t absorbant, so they don’t hold a very opaque black. I also found that the dried gouache tended to flake off of the mylar.

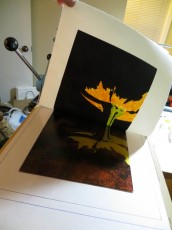
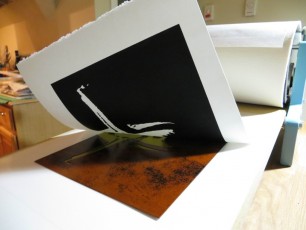
I had my first success with the larger, 8×10″ plates using a black adhesive vinyl stencil affixed to a sheet of glass. The black adhesive vinyl is completely opaque and the glass is clear and flat. The process I used was to paint a positive image with gouache on Bristol, then scan it, negate it in PhotoShop, then convert to outlines in Illustrator, then cut a vinyl stencil with a Silhouette craft cutting machine.

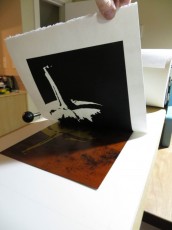
Adhesive vinyl on glass gave me a plate that was perfectly flat with very high contrast.

The process produced beautiful plates, but it was very time consuming and expensive and I felt removed from the artistic process as I spent most of my time messing around with pixels in PhotoShop and teasing the Silhouette machine to cut fine detail without jamming.

I’m glad that I now have a solid understanding of the factors that drive the quality of a relief plate and my hope is that I can use this knowledge to come up with a simpler, more artistic platemaking process.

Beautiful Relief Plate

After many failed attempts and much experimentation, I was finally able to make my first  really good 8×10 relief plate using SolarPlate. Leading up to the holidays, I had been working on smaller, 5×7 plates and was getting decent, but not great results for holiday cards. I finally bailed on the hand-made holiday card idea and went with VistaPrint, thus freeing me up to focus again on the larger, 8×10 prints.

I quickly found that the larger, 8×10 prints are a whole different ballgame and the process is much less forgiving. All of the small flaws that I could get away with in the 5×7 plates compounded into utter failures in the larger plates. It took me about three weeks of experimentation, using all of my free time to figure out how to make the plate shown below. It isn’t flawless but is pretty good – stay tuned for another post explaining how I made the plate and the dead ends along the way.

In the meantime, feast your eyes on the beautiful embossing and the rich black ink and the crisp crisp edges. After weeks lost at sea, all is well again in my humble printmaking studio.


Photopolymer Plates

I’ve been wanting to create prints of my notan studies for holiday cards and gifts. The 8×10 linoleum plates were promising, but a little large for gifts. When I tried carving a plate at notecard scale, I found that too much detail was lost. Thus began my adventure in making prints from photopolymer plates. These are metal plates that are coated with a light sensitive polymer that hardens when exposed to ultraviolet light.

The first step in making a photopolymer plate is to create a negative image on a transparent or translucent material such as vellum or Duralar. I prefer vellum because it doesn’t smudge and it works well with gouache. You can also use markers or an ink jet printer. When the plate is exposed, the white portions of the negative will allow light through and this will harden the polymer. The black portions of the negative will block light, resulting in uncured polymer that can be rinsed away.

The negative is drawn, painted, or printed on a piece of vellum or Duralar.

Here’s the finished negative. One interesting difference from linocut is that the negative is not a mirror image that is flipped left to right.

Photopolymer plates are exposed with a negative image on vellum or Duralar.

The negative is placed with its painted surface facing the photopolymer plate. The plate and negative are sandwiched between a piece of glass on the top and a rubber mat and a masonite board on the botton. The entire stack is clamped together tightly. The rubber mat helps ensure that the negative and the plate stay in close contact across the entire surface.

In preparation for exposure, I have created a sandwich of masonite, rubber, photopolymer plate, negative, and glass.

I expose my plates in a home-made black light chamber. After doing a number of test strips, it seems like exposure times from three and a half to four and a half minutes are good.

Exposing the plate for four and a half minutes under a bank of black lights.

Plates are developed in tap water and then exposed a second time to cure. Here’s the first plate after development. It turns out I didn’t develop it long enough, so there is still polymer in the white areas. This plate had about a quarter of a millimeter of relief and was very hard to ink without fouling the whites.

I didn’t develop my first plate long enough.

I pulled a couple of proofs from the first plate and had so much difficulty that I went back to the drawing board and eventually figured out that my first plate wasn’t fully developed.

These prints are from the underexposed plate. This plate does not have enough bite, so it was nearly impossible to keep the ink out of the white areas, especially near the stems.

My second plate used a shorter exposure and longer development. I rinsed and scrubbed for almost ten minutes until all of the polymer was removed from the whites. In solving the problem with the whites, I created another problem as the blacks became erroded and pitted during the longer development time. I will probably need to make a third plate with longer exposure and longer development.

This plate was exposed for three and a half minutes and then developed until all of the photopolymer was removed from the white areas. The longer development time led to some erosion in the black areas, so I will need to increase the exposure for the third plate.

The second plate has about 1 millimeter of relief and is much easier to ink. The stems are still hard to ink because it is easy to tilt the roller into the whites. My third plate will include a border all the way around to help hold the roller level. This border will print black, but I can cut it away after printing.

The second plate has more bite and is easier to ink.